Integrating AI in teaching and e-learning
Start with the learner action. Add AI only where it improves preparation, practice or feedback — and keep the judgement human.
CompletedMatch AI tools to six teaching jobs
| Teaching job | Tools that fit |
|---|---|
| 01 Plan and explain | ChatGPT · Gemini · Microsoft Copilot |
| 02 Ground in sources | Gemini Notebook · ChatGPT file analysis |
| 03 Differentiate | MagicSchool AI · Brisk Teaching · Gemini |
| 04 Create practice | ChatGPT · Gemini · Microsoft Copilot |
| 05 Create visuals | Canva AI · Adobe Express · ChatGPT Images |
| 06 Draft feedback | Brisk Teaching · ChatGPT · Gemini |
- Coach — ChatGPT Study Mode: guided questions and hints help learners reason through a task.
- Ground — Gemini Notebook: study guides, audio and questions stay tied to the sources you supply.
- Create — Gemini: draft quizzes, flashcards and study guides from a topic or file.
Use AI to create a useful learning move, not another place for learners to click.
Use AI for useful iteration at manageable risk
One concept, several ways to access it
Design a clear core experience, then offer equivalent ways to perceive, navigate and respond. AI can draft the alternatives — you still check them.
- Adapt the language: level and language variants.
- Offer source-based audio from material you supplied.
- Create visual alternatives and short media.
- Keep access reliable: verify captions and alt text, retain printable versions.
Never let an AI-generated alternative become the only route to the learning.
A lean prompt makes the work testable
- 1ContextLearners, level, module.
- 2TaskOne observable job.
- 3ConstraintsTime, scope, policy.
- 4EvidenceWhat good must include.
- 5OutputA format ready to use.
Lean prompt builder
Five parts make the output testable rather than merely plausible.
Who are the learners, what level, which module?
One observable job you want done.
Time, scope, policy, language, tools available.
What good must include — the visible quality criteria.
Format you can use immediately.
Better prompts expose the quality criteria
- Create a quiz about workplace safety.
- Create six scenario-based questions for first-year electrical students.
- Each item tests one named safety decision.
- Include answer, rationale and common misconception.
- Flag anything that requires local policy verification.
Prompting improves when the teaching decision is already clear.
Gemini Notebook
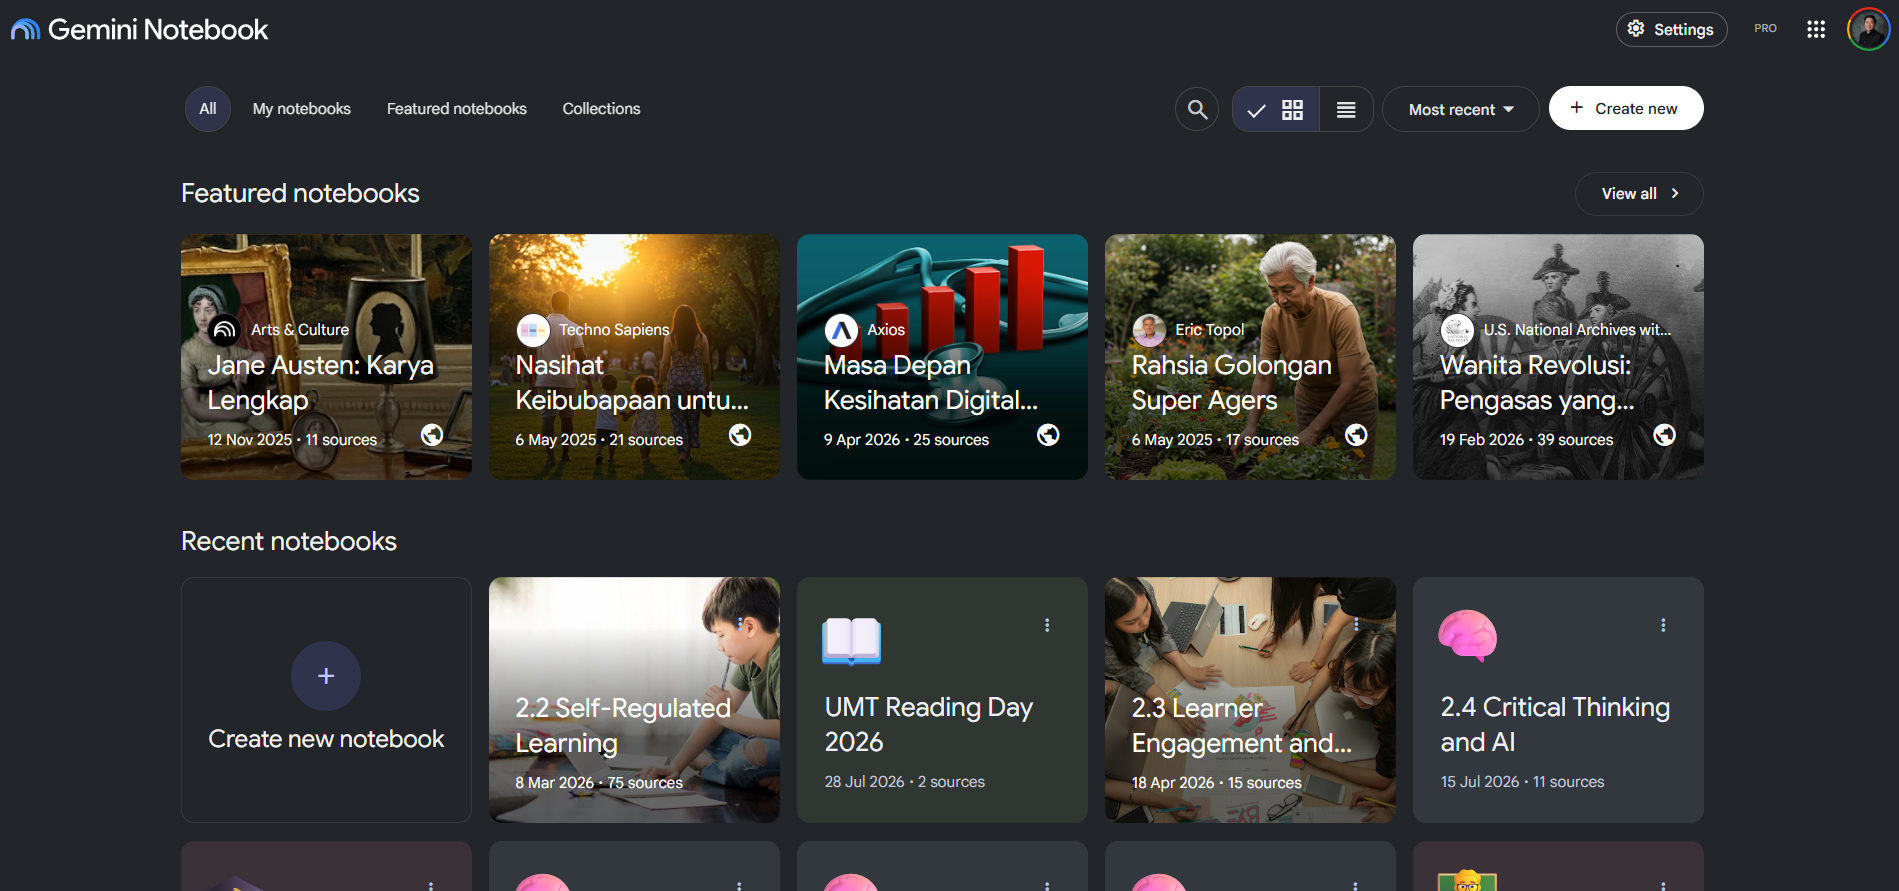
Gemini Notebook (formerly NotebookLM) is the safest tool for work that must stay tied to your curriculum documents, standards and textbooks.
Gemini Notebook only answers from the sources YOU upload. It does not invent material from the open internet, so the risk of hallucination is far lower and every answer comes with a citation back to the original source.
Three basic steps
- Upload sources: PDFs, Docs, Slides, web links, YouTube videos, text or audio.
- Ask questions — answers arrive with numbered references to the source sections.
- Generate material with the Studio panel to turn sources into other formats.
The Studio panel and what it can generate
| Format | Use for TVET educators |
|---|---|
| Audio Overview | Two-host podcast from your notes; 80 languages |
| Video Overview | Narrated slides for learners who missed the session |
| Mind Map | Topic structure for the opening set and end-of-unit revision |
| Flashcards | Drill terminology and definitions from your own notes |
| Quiz | Regenerate questions freely; can double as a study guide |
| Infographic | One-page visual summary for the workshop notice board |
| Slides | A first draft of a topic presentation |
| Data Table | Turn scattered information into an exportable table |
| Report | Structured written summary across multiple sources |
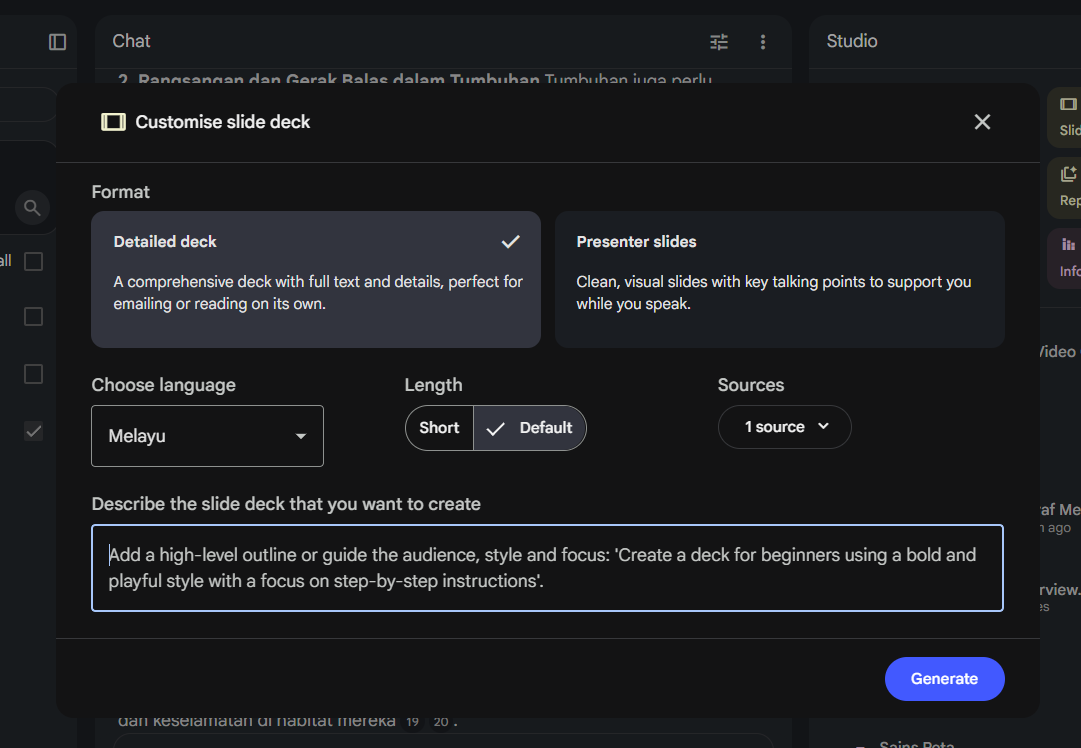
Every Studio format has a Customise option. Do not press “Generate” straight away. Spend 30 seconds telling Gemini the style, language, length and audience. Example: “Slides for first-year electrical learners, plain English, one main idea per slide with a workshop example.” Customised output lands much closer to your class than the default.
Turn an infographic into a worksheet
Beyond mind maps and slides, the Infographic format in the Studio panel can be steered into a complete learner worksheet. Upload your notes or reference sources, then use a custom instruction asking for one visual sheet with practice space, a comparison table and objective questions.
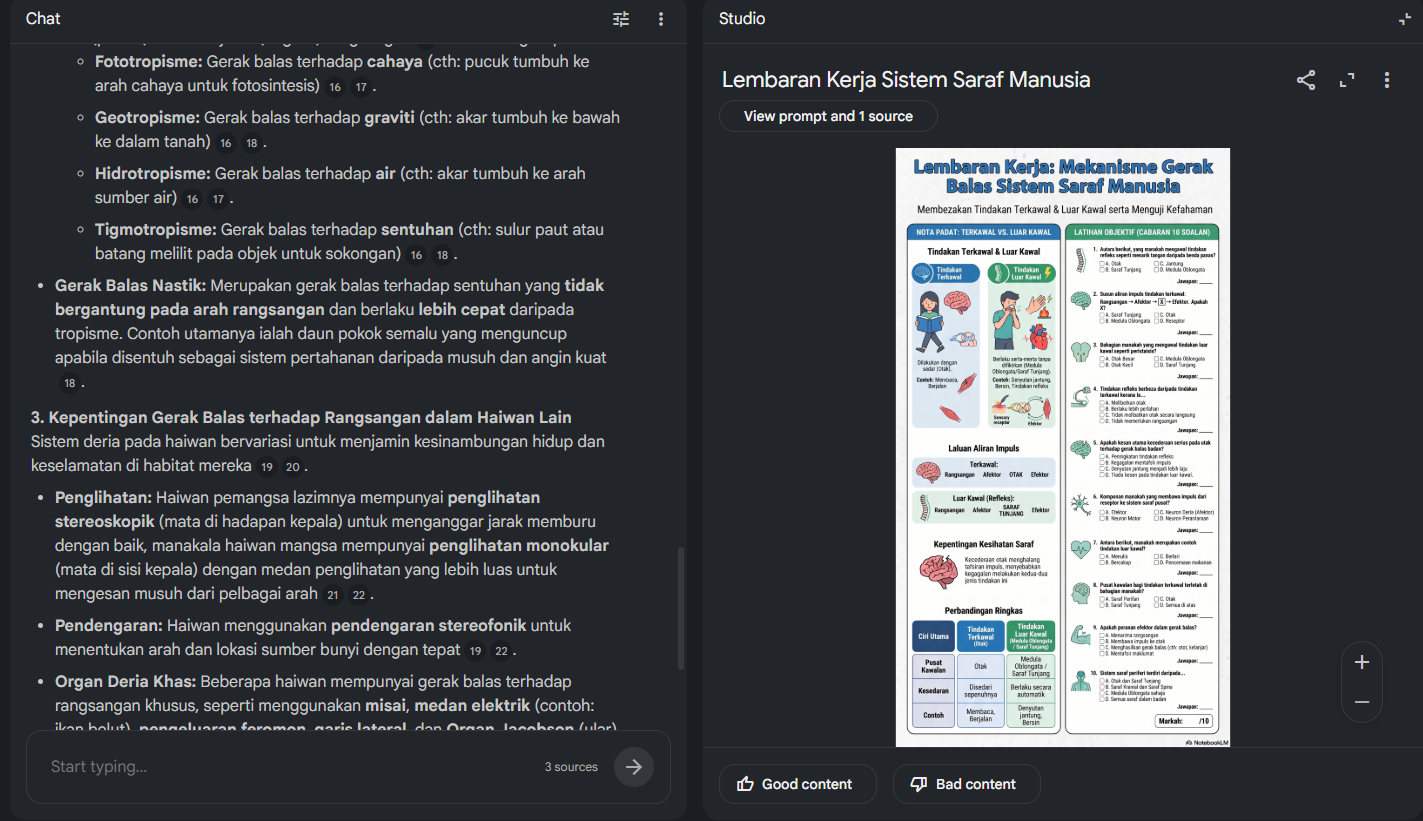
- Pick the Infographic format in the Studio panel, then press Customise.
- Be specific: “Make one learner worksheet with condensed notes, a comparison table and 10 objective questions.”
- Match the visual style to the group — icons and soft colours for supported learners, a dense format for exam revision.
- Export as PDF or image, then paste into Docs/Slides for a final edit before printing.
Generate a quiz straight from your sources
Gemini Notebook can also build a quiz directly from the sources supplied. Upload notes, a textbook extract or a video link, then choose the Quiz format in the Studio panel. It produces multiple-choice items with options and explanations, all traced back to the original source.
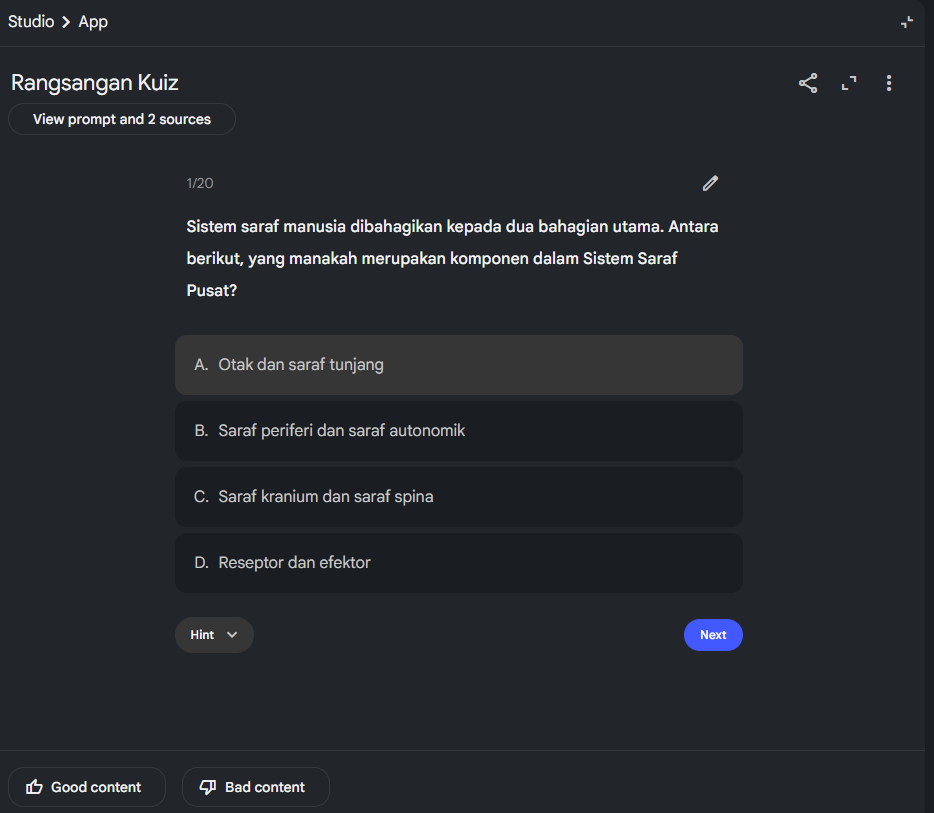
To move a generated quiz into another app, use the Chrome extension at nlmexporter.keeman.app. It copies questions and options into a format you can paste straight into Google Forms, Quizizz, Kahoot or your preferred quiz tool.
For custom instructions to generate infographics and slides, see nlmprompts.keeman.app— a collection of instructions you can copy straight into Gemini Notebook or Gemini for more creative visual results.
Gemini Canvas
Canvas is a mode in Gemini (the Canvas button under the prompt box) that does more than write text: it builds and runs a mini web app in the right-hand panel. That means you can produce simple learning games — interactive quizzes, term matching, random wheels, sequence-ordering games — with no programming knowledge at all.
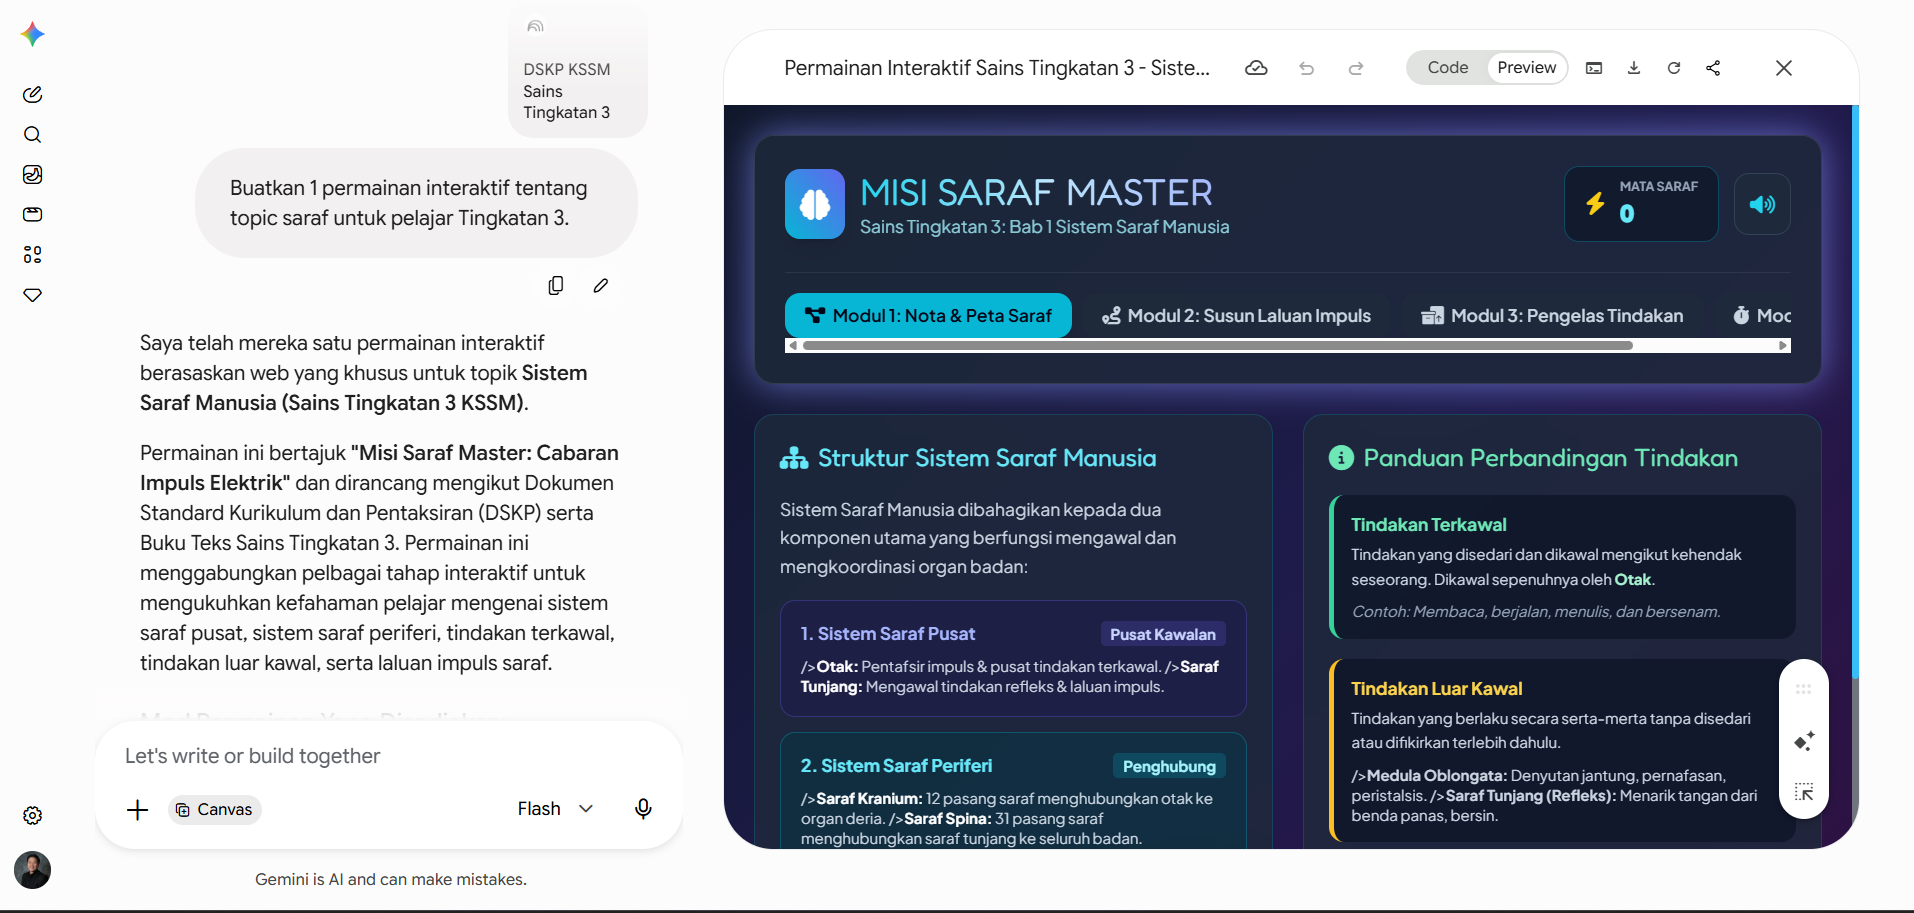
| Game type | Best for | Example use |
|---|---|---|
| Scored interactive quiz | Opening set / quick check | 10 objective questions with instant score and feedback |
| Term matching | Vocabulary, definitions, formulas | Match tool names to their function |
| Sequence ordering | Processes and procedures | Order the steps of a safe machine start-up |
| Random wheel / flashcards | Group work | Pick a learner or a question at random in front of the class |
| Simple simulation | Abstract concepts | A slider showing how current affects heat output |
You are a TVET instructor and interactive material developer.
Use Canvas to build a one-page matching game.
Topic: [topic and unit code].
Content: 8 term-and-meaning pairs in plain English.
Features: scoreboard, 3-minute timer, simple sound effect, "Play again" button.
Design: bright colours, large text readable on a classroom projector, mobile friendly.
- Open gemini.google.com and press the Canvas button before sending your prompt.
- Write a lean prompt stating topic, learner level, game type and required features — or select a relevant Notebook as the source material.
- Play it yourself in the preview panel. Test wrong answers, not just correct ones.
- Fix it in steps: “Make it 10 questions”, “Increase the text size”, “Add feedback when a learner answers wrongly”.
- Press Share for a link, or download the code to keep your own copy.
AI-generated games can contain wrong answers or terminology that does not match your standards. Play the whole thing once and verify every answer key before showing it to learners. Never put learner names or personal data into a game.
Google Flow
Google Flow is a creative AI workspace that acts as a partner through the full teaching-material cycle: brainstorming, prompting, batch editing, media organisation and publishing. Its built-in Agent can follow multi-step instructions, so you can move from a rough idea to a structured classroom resource without switching between several apps.
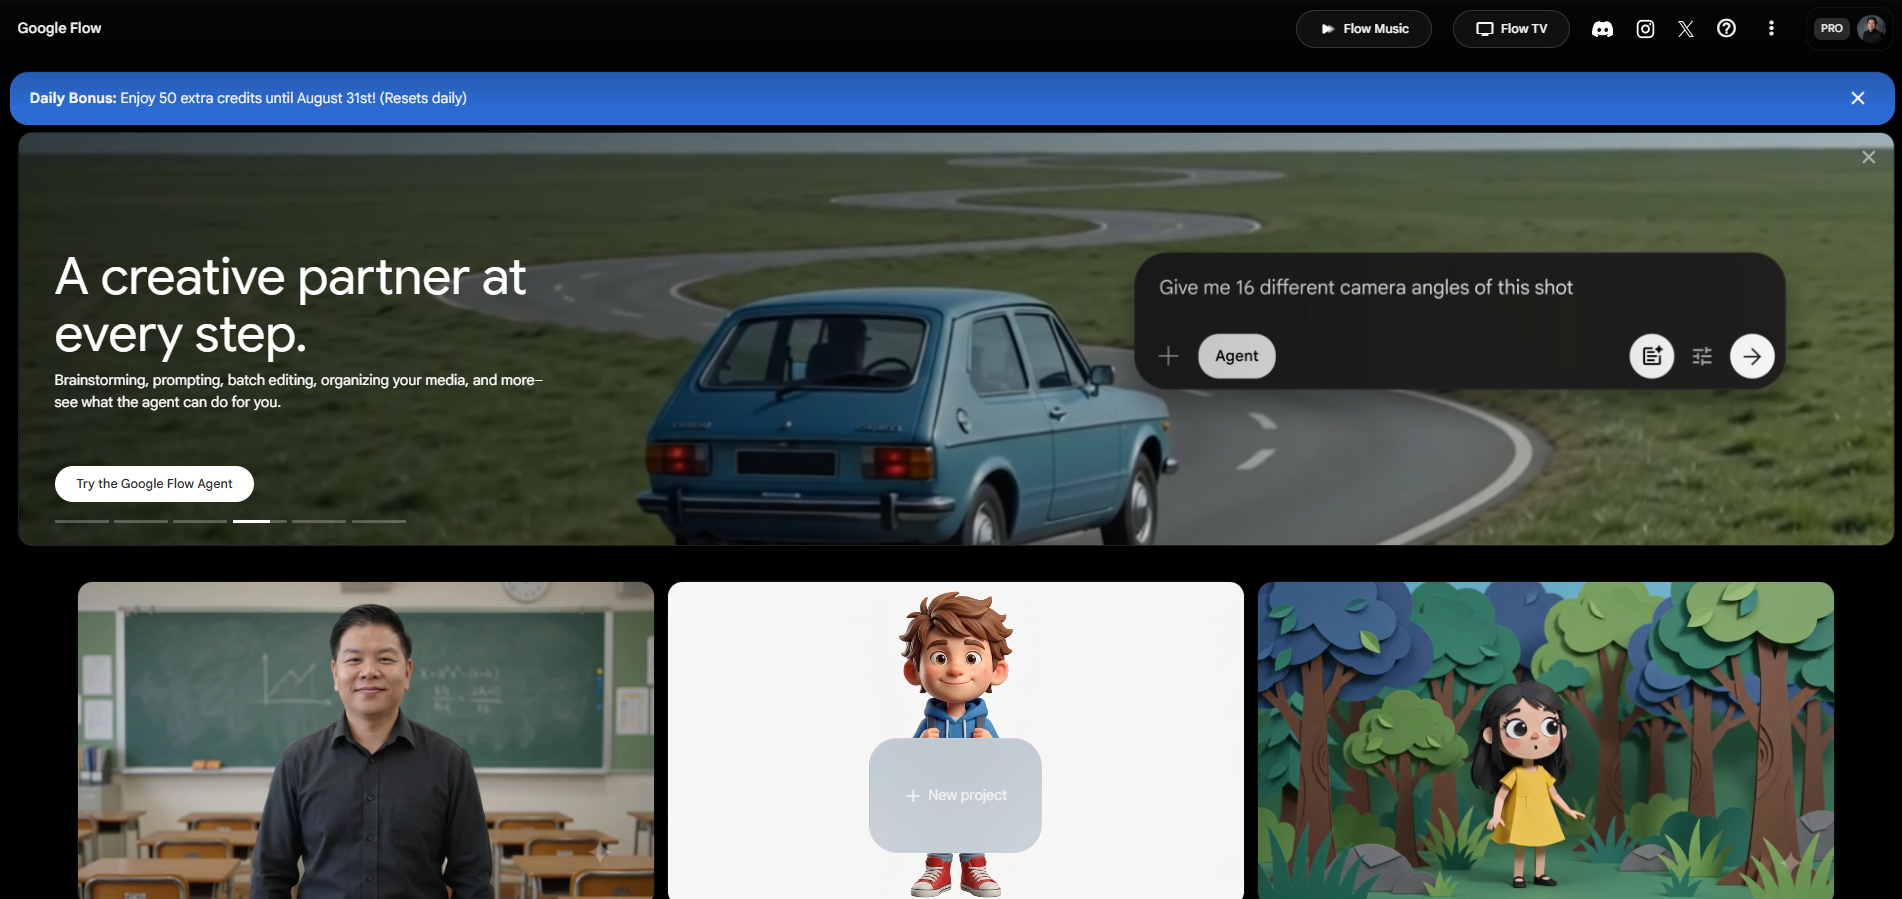
- Brainstorm lesson hooks — generate and refine opening activities, stories, or case studies tied to a unit outcome.
- Batch-edit materials — adjust tone, reading level, or format across several slides, handouts, or quiz items at once.
- Build visual sequences — produce image variations, storyboards, or step-by-step diagrams for practical demonstrations.
- Organise and reuse — keep projects, prompts, and generated assets in one place so the next cohort can build on them.
Creating images in Google Flow
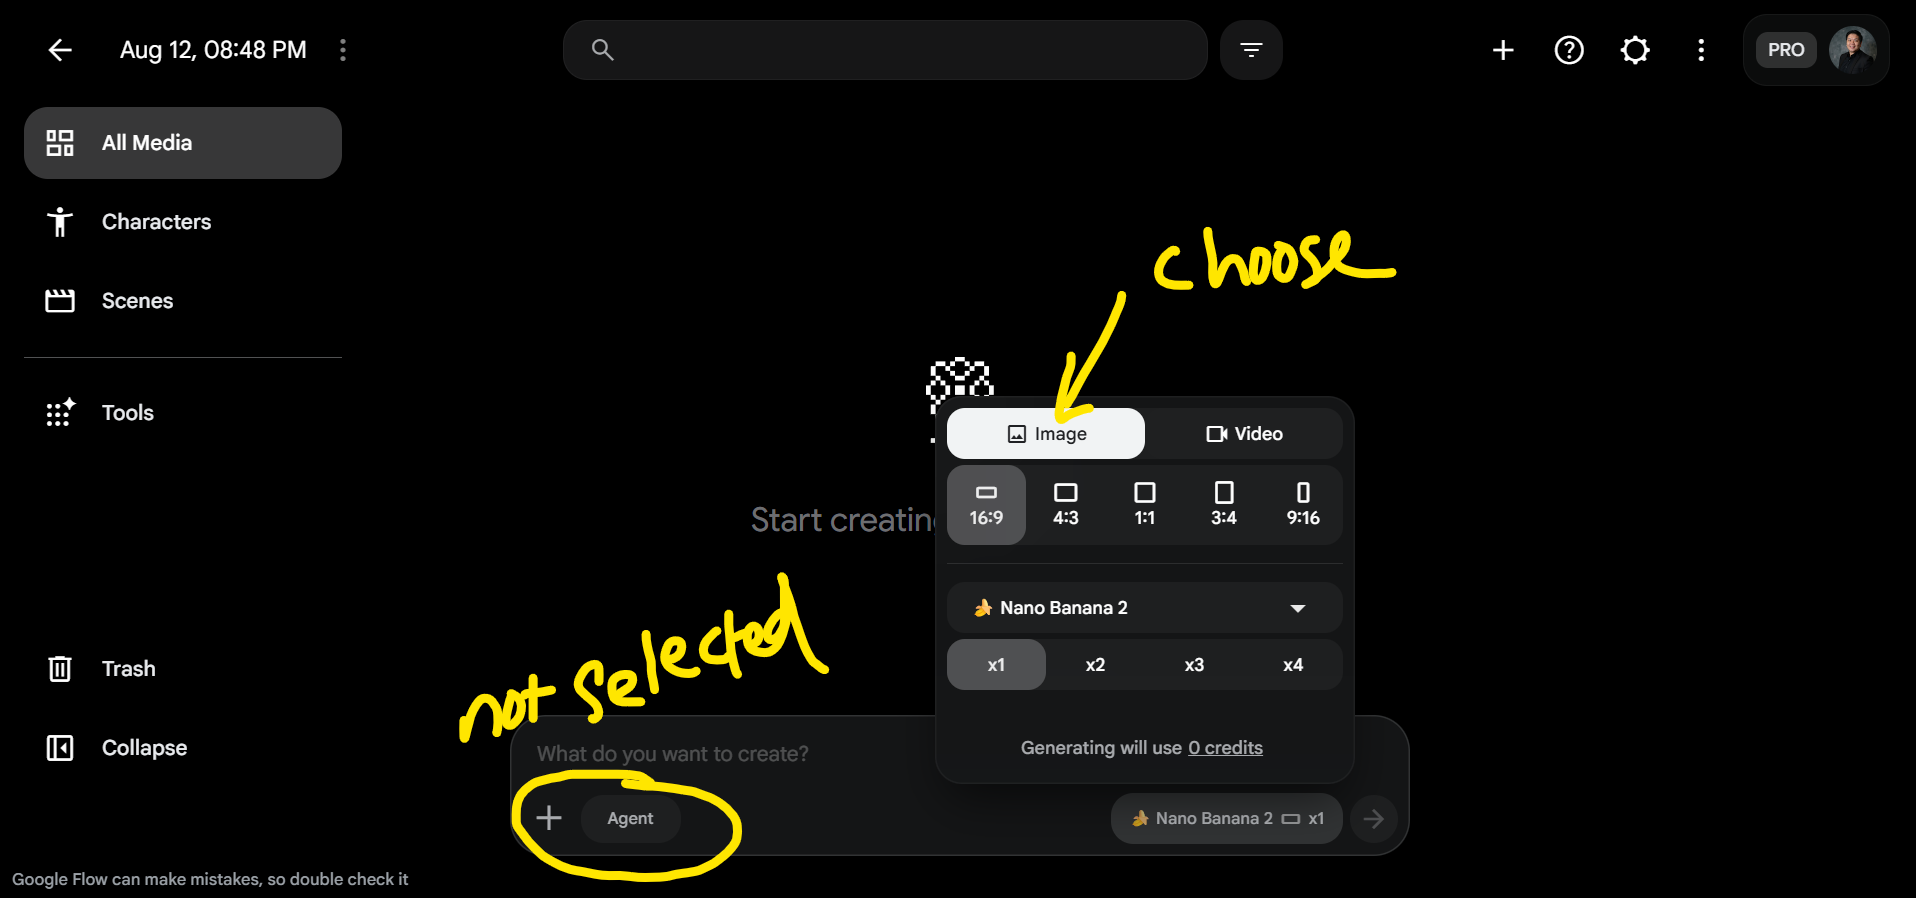
- Press the media type selector and choose Image.
- Set aspect ratio to match where the image will be used.
- Upload a reference image with + when consistency matters.
- Generate x1 first, refine the prompt, then batch x2–x4 once it looks right.
Create a professional character reference sheet based strictly on the uploaded reference image. Use a clean, neutral plain background and present the sheet as a technical model turnaround while matching the exact visual style of the reference (same realism level, rendering approach, texture, color treatment, and overall aesthetic). Arrange the composition into two horizontal rows. Top row: four full-body standing views placed side-by-side in this order: front view, left profile view (facing left), right profile view (facing right), back view. Bottom row: three highly detailed close-up portraits aligned beneath the full-body row in this order: front portrait, left profile portrait (facing left), right profile portrait (facing right). Maintain perfect identity consistency across every panel. Keep the subject in a relaxed A-pose and with consistent scale and alignment between views, accurate anatomy, and clear silhouette; ensure even spacing and clean panel separation, with uniform framing and consistent head height across the full-body lineup and consistent facial scale across the portraits. Lighting should be consistent across all panels (same direction, intensity, and softness), with natural, controlled shadows that preserve detail without dramatic mood shifts. Output a crisp, print-ready reference sheet look, sharp details.
A character sheet is worth the effort: once you have one, upload it as the reference for every later image so the same instructor, learner or technician appears across your whole lesson sequence.
Creating videos in Google Flow
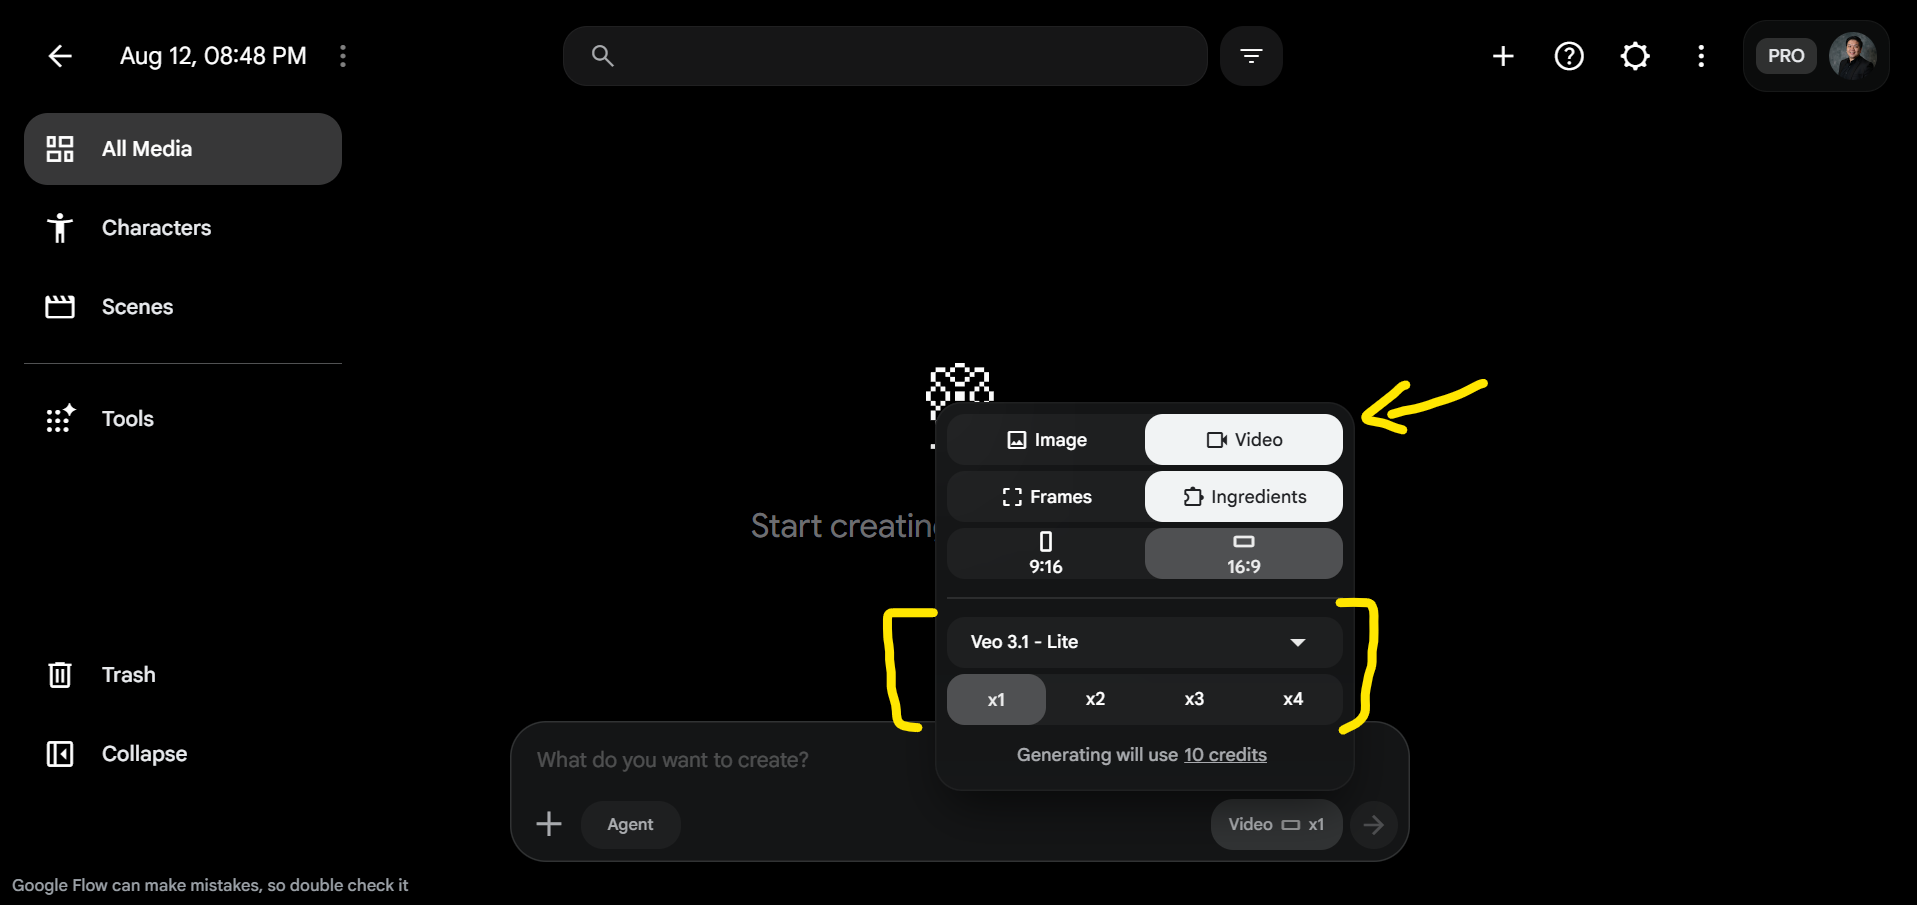
- Select Video in the media type selector.
- Use Frames and upload your generated image as the first frame, or Ingredients and upload the character sheet plus tool photos.
- Choose 16:9 for projector use, 9:16 for a phone-first micro clip.
- Write the prompt as: subject and setting → action → camera movement → lens and style → lighting → audio.
- Generate x1, watch it, fix one thing at a time, then generate the final take.
Use the uploaded image as the first frame.
A TVET instructor in the uploaded reference image performs a pre-start safety check on a bench grinder in a training workshop.
Action: he points to the guard, taps the eye-shield, then gives a clear thumbs-up to the camera.
Camera: slow dolly push-in from medium shot to medium close-up, eye level, subtle handheld float.
Lens and style: 35mm, shallow depth of field, observational documentary realism, natural colour.
Lighting: soft daylight from the workshop windows, controlled shadows, no lens flare.
Audio: quiet workshop ambience, no music, no dialogue.
Duration feel: one continuous 8-second take.
Use the uploaded image as the first frame.
Close-up of a pair of hands wiring a three-pin plug on a clean workbench.
Action: strip, place the brown wire on the live terminal, tighten the screw.
Camera: top-down overhead shot, slow 90-degree orbit around the plug, then settle static on the terminal.
Lens and style: 50mm macro, crisp instructional look, high key, minimal background clutter, no text overlays.
Lighting: even soft box lighting from above, no harsh reflections on the metal.
Audio: light ambience and the click of the screwdriver only.
Use the uploaded image as the first frame.
A learner stands in a dim workshop as the overhead lights switch on and the machines come to life.
Action: she lifts her safety glasses into place and steps forward with confidence.
Camera: low-angle hero shot, slow tilt up, gentle crane rise, ending on a wide shot of the workshop.
Lens and style: 24mm anamorphic, cinematic teal-and-amber grade, light haze in the air, film grain.
Lighting: strong backlight from the ceiling fixtures, rim light on the shoulders, deep shadows.
Audio: rising low hum and a single soft musical swell, no dialogue.
You are a TVET instructional designer.
I need a visual sequence for a workshop demonstration on [topic / unit code].
Create 5 images that show the same step-by-step procedure from different angles and safety states.
For each image: add a short caption in plain English, one safety reminder, and a question a learner should be able to answer.
Keep the same character, tool and workshop setting across all images.
Flow can generate images, text, and layout variations quickly. Always verify that people, tools, safety labels, and local procedures are shown correctly. Never share learner photos, names, or personal data as part of a generated asset.
Every AI output passes a human quality gate
Also check the tool itself: learning value, access, data and privacy, grounding, review and exit. If the value is unclear, the sources are weak or access is unequal, redesign first.
Build one AI-assisted teaching asset
Use the high-friction step from your map. Treat the first output as an experiment, not a deliverable.
Leave withA reviewed first version.
Three minutes: one minute on the learner problem and current friction, one on what you built and what changed, one on evidence, risk and your next test. Audience gives one strength, one question, one next experiment.
Keep / Change / Test.
Saved in this browser automatically.
Mark it so your progress is kept in this browser.